
Using Drip Irrigation Micro-Tubing
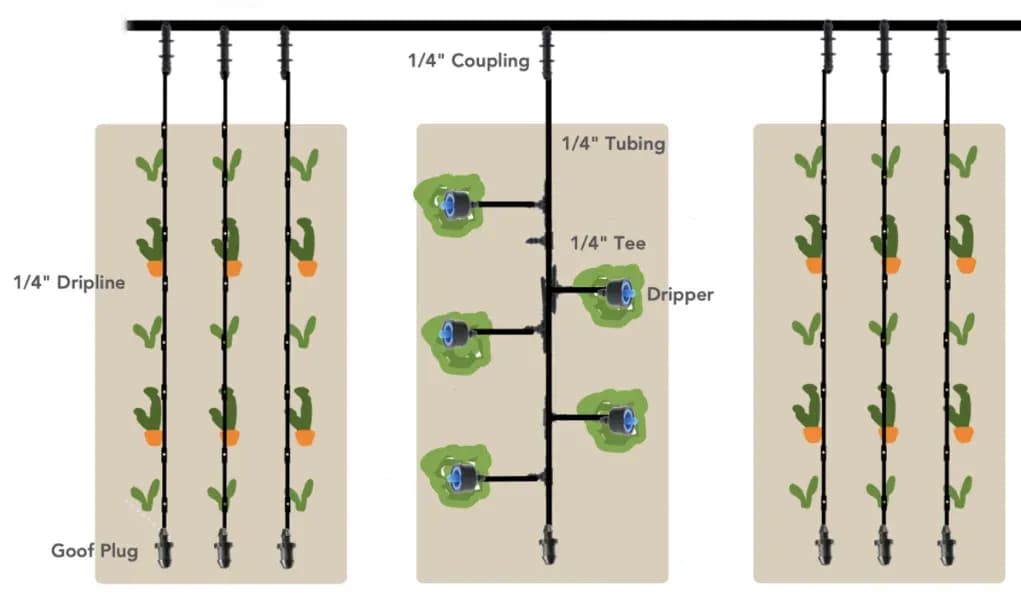
Summary: Drip irrigation micro-tubing is the small-diameter tubing, usually 1/8 inch or 1/4 inch, used as a feeder line from a mainline or distribution line to individual emitters, stakes, bench zones, or container crops. It matters because micro-tubing allows precise low-flow delivery in nurseries, greenhouse production, and specialized agricultural layouts without forcing large tubing close to every plant. According to standard micro-tubing friction-loss charts, 1/4 inch tubing can lose about 15.6 PSI per 100 feet at 12 GPH and about 44.3 PSI per 100 feet at 21 GPH, which is a major pressure drop for a system that often operates at only 15 to 25 PSI. This article explains when to use micro-tubing, how to keep pressure loss under control, and where it fits in agricultural drip design.
What drip irrigation micro-tubing is used for
Micro-tubing is not a replacement for mainline or submain pipe in most agricultural systems. Its primary role is local distribution from the main network to individual plants, drip arrows, manifolds, spray stakes, or container positions. That makes it especially useful in greenhouse production, nursery propagation, bench systems, and specialty crop blocks with irregular plant spacing.
In rare low-flow layouts, micro-tubing can serve as a very short distribution line, but long runs create friction loss too quickly. For related components, browse distribution tube, drippers, and the greenhouse drip irrigation solution.
How to use drip irrigation micro-tubing in 5 steps
Step 1: Use micro-tubing as a feeder line, not as the main field line
Micro-tubing is best when it carries a small, localized flow from a larger distribution line to a precise watering point. It is not the right choice for long agricultural mainlines because the pressure loss becomes too high. Use main pipe or lateral pipe for transport, then switch to micro-tubing close to the plant or bench zone.
Step 2: Keep the tubing run as short as possible
The longer the run, the more pressure is lost to friction against the tube wall. According to standard micro-tubing friction charts, 1/8 inch tubing becomes restrictive very quickly even at modest flow, which is why it is usually used for single feeder applications rather than multiple emitters. Shorter runs preserve pressure and keep emitter performance more uniform.
Step 3: Match flow rate to tubing size and operating pressure
Micro-tubing is a low-pressure component. Common operating pressure is often 15 to 25 PSI, while the practical maximum is usually about 30 to 35 PSI depending on the tubing material and fitting style. If the run is long and the flow is high, pressure loss will quickly push the emitter below its working range.
Step 4: Choose the right micro-tubing format for the job
Use 1/8 inch tubing for individual feed lines to a single dripper, spray stake, or manifold outlet. Use 1/4 inch solid tubing for slightly longer feeder runs or a small number of emitters when the run length is controlled. Use 1/4 inch dripline with built-in emitters when repeated spacing is needed along a short bed, bench, or nursery row.
Step 5: Verify field performance with a pressure and discharge check
Once the system is installed, run the block and compare emitter output at the near end and far end of the micro-tubing run. If the far end is visibly weaker, shorten the run, reduce emitter count, or switch to a larger upstream distribution line. Hydraulic theory only matters if it still holds true after the system is assembled.
Micro-tubing options compared
| Option | Pros | Cons | Best suited for |
|---|---|---|---|
| 1/8 inch micro-tubing | Very precise point delivery, compact routing, useful with manifolds and stakes | High friction loss and poor suitability for multiple emitters | Best suited for single-feed greenhouse, nursery, and propagation applications |
| 1/4 inch solid micro-tubing | More flexible for feeder lines and short distribution runs | Still limited by friction loss at higher flow and longer distance | Best suited for short agricultural feeder runs, container crops, and bench irrigation |
| 1/4 inch dripline | Built-in emitters save labor and keep spacing uniform | Less flexible if plant spacing changes frequently | Best suited for nursery beds, bench crops, and tight-spacing agricultural plantings |
Why friction loss matters so much in micro-tubing
Friction loss is the pressure lost as water moves against the inner wall of the tubing and through fittings or emitters that disturb the flow. Because micro-tubing systems start with low pressure, even a moderate loss can make the emitter discharge poorly or stop working altogether. This is why a 30-foot run at high flow can behave worse than two 15-foot runs with the same total water demand.
When the application needs more distance or more flow, move the transition point closer to the plant with a larger upstream line such as main pipe or lateral pipe, then keep the micro-tubing short.
Where micro-tubing fits best in agricultural irrigation
Micro-tubing is most effective in protected agriculture and high-density crop layouts where each plant, tray, or container needs targeted water delivery. It is also a practical choice for arrow drippers, manifold outlets, and bench-based irrigation layouts. If the crop spacing is uniform and repetitive, integrated dripline may save more labor than solid micro-tubing.
Bottom line
Using drip irrigation micro-tubing successfully depends on respecting its role as a short, precise feeder line rather than a long transport line. Expert advice: first, keep micro-tubing runs short enough that the far-end emitter still performs normally; second, choose tubing size based on actual flow and pressure, not on what is easiest to route by hand. For related hardware, browse distribution tube, drippers, and drip irrigation products.


